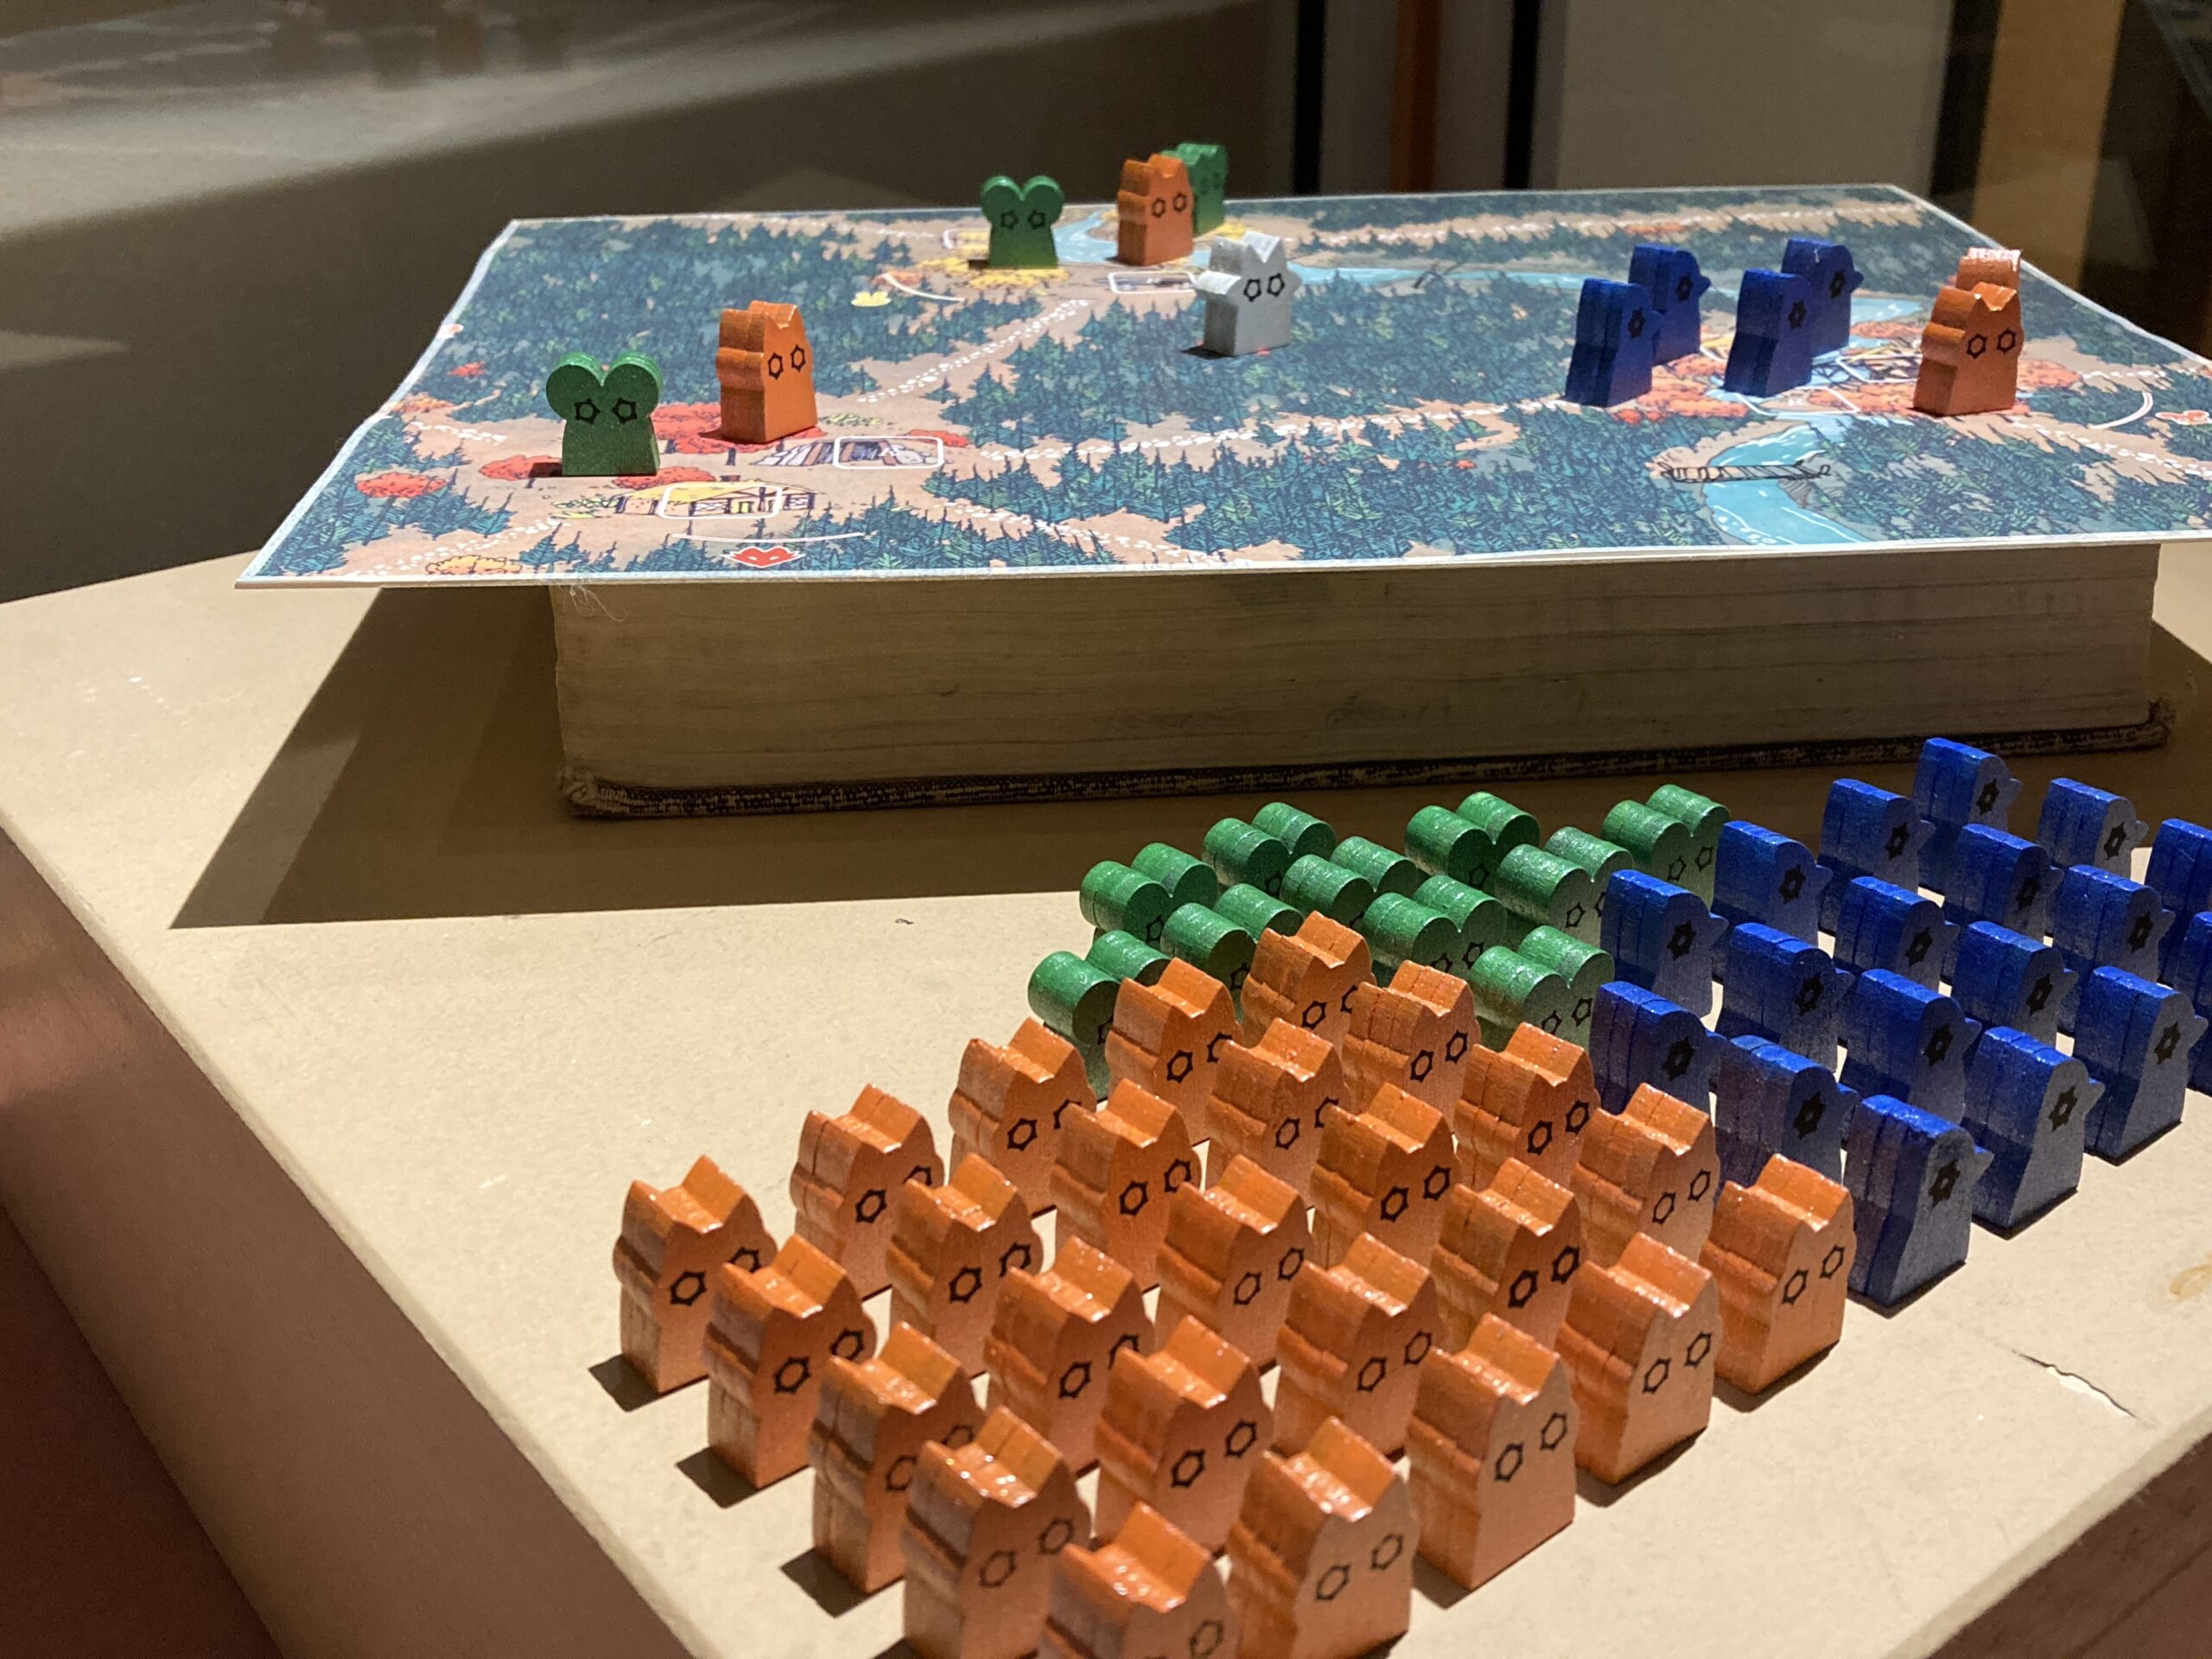
Every spring, my university’s art campus has a student art exhibition. They ask every student in the arts pathway to submit five pieces (seven for seniors). One of my submitted pieces in particular stood out as entirely odd for a show like this: I spent weeks working on a production craft piece. Dozens of little wooden custom, handmade board game pieces (meeple) populated a display case in premium Artist Spotlight Gallery real estate, set next to other students’ ceramics and porcelain works.
This came about as a result of my friend group and I getting really into a board game called Root earlier in the year. In Root, you play as one of several asymmetric animal factions vying for control of the vast Woodland. Players compete to be the first to score 30 victory points by performing various actions unique to their faction. All factions come with a certain number of troops to be placed on the game board. The board game community commonly refers to these troop pieces as “meeple;” they’re small, wooden, flat-faced and mass-produced painted pieces. Many credit the board game Carcassonne with popularizing the standard single-color star-shaped meeple commonly seen in a lot of board games today. Root, however, uses custom shapes and screen printed faces for each faction to give them more personality.

When my friend group fell in love with Root, we also fell in love with the personality of the wide array of meeples in the base game as well as the expansions. And boy does Root have expansions. As of writing this, the game features four primary expansions that add two to three new factions each, plus additional card decks and a set of “hireling packs” that add pseudo-factions called hirelings that also required their own custom meeples.1


ROBOTS!
In addition to the wide array of standard expansions, Leder Games, the creators of Root, also experimented with a novel concept they later expanded upon and dubbed The Clockwork Expansion. The whole point of the expansion was to add robotic faction boards for the existing factions that can, in essence, play themselves. On their turn, a human player takes action for the robotic faction. The faction, however, decides its actions through carefully constructed routines and rules on the faction board. No human input for decision-making is required.
The function and functionality of this mechanic stunned my friend group. As far as we’ve tested, many of the Clockwork factions play so similarly to how a real player would that it feels just like adding an extra player. But, to us, there was one critical thing missing: the robotic factions didn’t have their own meeple. Now, from a financial standpoint, this makes sense. The whole point of the robotic factions is to replace the standard faction in gameplay. You’re never intended to have a human player playing the same faction as a robot in the same game. Leder Games intended for the standard faction meeple to be used for the robotic factions. This saves a lot on production costs and passes those savings along to customers.
I wouldn’t stand for this. The lack of Rootbotic meeple in the expansion most disappointed the friend in our group who actually owned Root, and I wanted to get him a gift that expressed my appreciation for him. So, I set out on a journey to learn just exactly how meeple are made.
The Process
The first wall I immediately hit was coming to the realization that nearly every step in the traditional meeple production pipeline was inaccessible to someone like me. When a board game needs custom meeple like this, the publisher can typically justify the production cost of having custom router bits and paint tumblers made by the meeple producer for the necessary pieces. I was working on a distinct lack of a multiple-thousands-of-dollars budget, so I needed to make some concessions.
The Goals
The first step of the process is determining the scope of what I’m making. At the time I started the project, my friend had only gotten his hands on the first Clockwork Expansion. This only contains the four factions from the base game. This felt like a fair challenge for me, so I set out to make the number of meeple in the base game. That’s 25 Marquis warriors, 20 Eyrie warriors, 10 Alliance warriors, and one Vagabond pawn.
For the finish, I wanted to include some kind of metallic or iridescent medium in the paint. This would give them a metallic, robotic sheen that sets them apart from the standard meeple. I also wanted to screenprint custom faces to give at least a little personality to the robots. With that decided, I had what I needed.
The Design
I needed to make outlines of the pieces in scale in SVG format no matter what cutting step I take. I used Adobe Illustrator and a caliper to get the scale of the meeple as close to perfect as possible. A fellow DIY Root fan on the internet made a similar trek before in an attempt to make 3D printed embossed meeples. While the scale was completely off, their shapes were as close to identical to the original pieces as one could reasonably expect. And so they served as stellar references for my own vector outlines.

In addition to the outlines, now was the time to come up with designs for the screen printed faces. After a lot of deliberation, I came to the unfortunate conclusion that my skill as a vector artist just wasn’t at the level I wanted it to be to make more exciting custom faces. Instead, I opted for a variety of cog eyes that varied in the number of teeth, inner and outer thickness, and missing/snapped off teeth in an attempt to retain as much of the personality from the original faces as possible.
The Cut
Now that I had just about everything mapped out, the first physical step in the process is acquiring and cutting wood. In full-scale meeple manufacturing, unless the shape of the piece is significantly complex, the manufacturer will usually have a set of custom router bits created for each meeple shape. Router bits are essentially oddly shaped pieces of metal that spin at rapid speeds in a stationary position. This creates a particular cut shape when wood passes by them. In the traditional process, long, straight pieces (typically five to ten feet in length) of 1″x1″ or 2″x2″ wood move length-ways past each router bit. The resulting cut is one ten-foot long meeple. The manufacturer then cuts down the shaft at equal intervals to make the individual pieces.
The problem with this process for my project is pretty simple: Custom router bits are freakishly expensive. It makes sense; they forge high-speed steel to a completely unique precision shape. That’s not exactly the cheapest process in the world. Regardless, it was not an option here. Instead, the less standard option for manufacturers is laser cutting. They generally only resort to laser cutting for significantly sharp or complex shapes. Thankfully, my school’s print room has a wood laser cutter available to students.
Finite Lasers
The next problem came about when I spoke to our print professor about using the cutter for this purpose. There are concessions that have to be made with smaller laser cutters. In laser cutters like the one at school, they have a relatively small focal length for the laser beam from the lens to the point of focus. This cutter in particular has a focal length of a bit over one inch, the lower end of focal lengths. As the focal length of a laser cutter gets smaller, that cutter gets worse at cutting thicker materials completely vertically. If I wanted to cut wood at the standard thickness of the meeple (approximately 9/16″), I would need a laser cutter with something nearing a professional setup.
My professor was kind enough to offer me access to his home laser cutter with a focal length close to 4″. Even then, that focal length would introduce noticeable diagonal cuts, resulting in tapered meeple. He instead made the recommendation that I cut on a piece of wood one third the target thickness, cut three times the pieces, and glue three together to reach the appropriate width. That’s what we ended up doing. We cut hundreds of little wooden slices on his home machine. They arrived to me in little baggies and stuck in the negative a couple days later.

Glue & Sand
By this point in time, I had let my other friends that play Root with me know about the project. I told them that it was a surprise, and they were excited to help. I enlisted their help in tap gluing dozens of meeple together. The process was pretty simple: dole out a large drop of wood glue, take a small bit of it and tap it on the work paper using a finger until it’s stringy and thick, then apply it to both live sides of the wood. The tapping partially dries and firms the glue. This allows it to dry much more quickly and supposedly adhere better than when entirely wet. With flat bottoms, it was pretty simple to precisely line up the three faces while they were still moveable. In the end only a few out of the many were noticeably misaligned.

After an hour of tapping and watching MLP: Friendship is Magic, we had our dry meeple. All they needed before the next step was some sanding to remove burrs from the cut and the excess glue around the edges.
The Paint
With cutting, gluing, and sanding out of the way, the most interesting step had arrived. Painting worried me from the start; in the typical process, manufacturers employ the use of large, rotating drums comparable to cement mixers to evenly coat and dry the meeple with paint. They place the meeple in the drum, and add small amounts of paint periodically to layer and dry on the wood. Once again, the appropriate process escaped my grasp.
Instead, I had the idea, insane in hindsight, to rediscover my art campus’ rich history of automotive work by using one of the dozens of compressed air lines found throughout the building for airbrushing. Spraying the paint on would allow me to evenly coat many pieces at once, I thought.
The other variable here was determining paints. I had some standard student-quality acrylics left over from my 2D Composition class last year, but those paints lose vibrance fast when mixed with each other. Instead, I found a friend who was kind enough to lend me some of their single-color acrylics. These allowed me to match colors with more accuracy. After some research and hunting, I was also able to find an iridescent medium from Liquitex made for mixing with other acrylics to add a glittery sheen.
Wild Winds
As soon as I began brushing, the first issue became immediately clear. Little pieces of wood are unsurprisingly very light and tend to blow away when heavy winds full of paint fly by. The airbrush was simply too strong for the meeple, and I needed a way to keep them held down when brushing. I got lucky that I saved the negative wood from the cut. Placing the meeple back in their original holes before spraying mostly kept them contained on the table. Some still blew away.

The next issue was that I was a very impatient person. I didn’t wait long enough between coats, especially on the Marquis de Cat. This resulted in some meeple requiring additional hand-painted coats to correct bald spots from thin, runny paint. You don’t know Sisyphean work until you have to hand paint tiny wooden pieces using paint thinned down to airbrush consistency.
Eventually, every piece was painted with color. Besides some lackluster cats, most pieces turned out really solid. The Woodland Alliance toast mice looked especially wonderful with some of the medium mixed into the lighter green color. But the airbrushing wasn’t over yet. For most of the pieces, even a large ratio of medium to standard color didn’t result in very much shimmering at all. They required an additional coat. The benefit of a medium like this is that it dries clear. I could simply spray water-thinned pure iridescence right on top of the color layer with no downside. The result was subtle but lovely: a reserved glittering especially visible on the Eyrie Dynasty’s bird warriors and the black Vagabond pawn.
The Print
Having cleared the paint hurdle, I started the last step: The screen printing. It’s not custom handmade Root meeple without screen printed faces! I actually learned how screen printing worked from my professor as I did it. It’s a really fascinating process.
It all starts with a mesh screen made up of a very fine weave of synthetic polyester threads2. The screen is coated with a thin layer of a photosensitive chemical. Once a designer finalizes a design, they print the design onto a piece of transparent plastic using a traditional paper printer. They place this printed transparency on top of the screen and expose it to ultraviolet light. The UV light solidifies the photosensitive chemical everywhere except where the black printed part of the design appears on the transparency.
This allows the artist to power wash the screen with water. Anywhere the chemical was exposed to UV stays, and anywhere the design on the transparency blocked the UV gets blasted out. This makes the new “apertures” in the screen permeable to ink while leaving the rest impermeable.
My Screen
Making my screen was pretty trivial, because I had four tiny designs. They didn’t need to interact with each other in any way. I placed all four sets of eyes near the center of the screen with plenty of space. I never ran into any big issues with the screen preparation process. Once the screen was prepared, I began actually printing. To print, I would first pass over the apertures gently using a squeegee and black ink. This floods the permeable parts of the screen with ink. Then, I would lower the screen onto the face of the meeple and pass with more pressure in the opposite direction of the flood. This pass would be the actual ink transfer pass.
I was very happy that the printing process was mostly without anguish. A couple Marquis warriors’ eyes were a little thin and light, but beyond that most had pretty solid faces. I was especially happy with how the Vagabonds I made turned out. Since I had three blank Vagabonds at the start, I decided to make one of them black with white face ink. This matched the black second Vagabond that comes with the Riverfolk Expansion. The contrast between the two, especially with how prominently the iridescent medium shone on the black Vagabond, made something magical.

The Result
In the end, while the cog eyes felt a little same-y for all of them, I was really proud of the end product. Even without many of the industry standard tools, I was able to put some pretty clean production craft together.


I was so proud, in fact, that when I finally told the friend that they were being made for about the project, I told him that they came with a stipulation that I would be able to submit them to the university student show, and he would receive them after the exhibition ended. He was very gracious to allow me to delay his gift despite his excitement.
It felt odd submitting them to the show, because they’re obviously more than one piece, but they also required a novella of explanation and additional set pieces to give them context if they were to be put on display. Happily, just like the other four pieces I submitted to the show, the gallery accepted them for exhibit! In fact, the school’s gallery director was so excited about such a unique piece being displayed during the show that he moved them from the freshman and sophomore side hallway to a prime spot in the tertiary gallery alongside junior students’ works.
Accessories!
For submission, I included an abridged game play map to display under some meeple. The gallery director loved this idea but asked me to extend the piece one step further by writing up a companion explainer document. I happily obliged, and designed it in the style of the Root manuals and rulebooks. It describes a brief history and overview of Root and details the source of the idea to make custom handmade meeple in the first place.


When it came time for the show’s reception, the piece as a whole seemed to be a hit! I don’t think too many people stuck around to read “History of Root” because the student show receptions are more akin to herding cattle to slaughter than a truly enjoyable gallery experience, but all in all it seemed like guests really enjoyed my queer little war machines.
- The etymology of “meeple” is comparable to “fish;” the singular and standard plural, when referring to multiple of one type of meeple, is meeple. The alternate plural, when referring to multiple types of meeple, like discussing groups of both green mouse and orange cat meeple at the same time, is meeples. ↩︎
- For more specialized applications, nylon or stainless steel meshes are sometimes used. ↩︎
Leave a Reply